The majority of the top 1 million websites now use HTTPS, and for good reason:
Considering that SSL/TLS certificates don’t even cost you anything (see Let’s Encrypt for free certificates), there’s every reason to use HTTPS for a website.
When migrating an existing site from HTTP to HTTPS, it’s often difficult to find all the old http:// URLs that need to be changed to https://. Missing just a single link to an image, script, or other resource, results in a Mixed Content warning in the browser. In this post, I will demonstrate how to use Dr. Link Check for finding all http:// URLs on a website.
Go to the Dr. Link Check homepage, enter the address of your website, and click on Start Check.

After the check is complete, Dr. Link Check will display the number of http:// links under Link Schemes on the Overview page. Click the http: item to open a report listing the found links.

The report lists all http:// links found on your website, including those to other websites. If you want to restrict the report to internal links, click the Add button in the Filter bar at the top of the report, and select Direction from the menu. Now, click on Outbound and select the Internal menu item.

As presented above, Dr. Link Check is not only a great broken link checker, but it can also help you migrate your website from HTTP to HTTPS. Give it a try!
We have updated the pricing model for Dr. Link Check to make it more transparent and easier to understand. You now buy the capacity to check websites of a certain size (based on the number of links it contains), and you can then check those websites as often as you want during the term of your subscription.
Previously, we were giving you a monthly quota of links that could be checked, and it was up to you how to use this quota. With a quota of 20,000 links, you could run one single check on a website with 20,000 links, or 20 checks for a smaller site with only 1,000 links. Once the quota was used up, you either had to upgrade your subscription or wait for it to reset with the next subscription cycle.
We now know that this is not what users want. If you are working on fixing your website’s links, you don't want to wait until next month to run another check to verify your changes. From now on, you can run as many checks on a website as you need, without having to worry about running out of your quota.
The prices of existing subscriptions won’t change, but you will benefit from the removal of the quota system. If your subscription previously included a quota of 20,000 links per month, it now has a limit of 20,000 links per website project.
In case you have any questions regarding the changes, please get in touch.
We have made it easier for Dr. Link Check users to spot exactly where a broken link is found. If you click on a link’s Details button, you will see up to 11 different URLs of documents that contain the broken link.

In order to view a document’s source code, just click the Source button located right next to the URL. Dr. Link Check will now fetch the HTML or CSS code from the server and highlight the location(s) of the link.

We hope that this feature is useful to you. If you have any suggestions to improve it, please let us know.
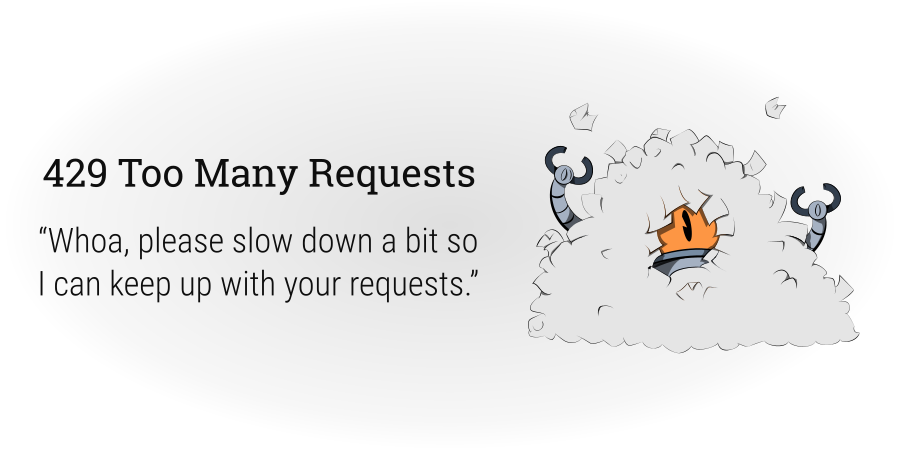
We at Dr. Link Check see lots of server error pages in our daily work, and honestly, the majority of them are downright boring. You can find a great “404 Not Found” page here and there, but other common errors (such as “403 Forbidden” or “503 Service Unavailable”) rarely get much love from web developers and designers.
That’s why we decided to ask a designer to come up with ideas for turning HTTP error codes into creative artwork. The result is a set of nine images that we make available free of charge under the Creative Commons CC BY 4.0 license.
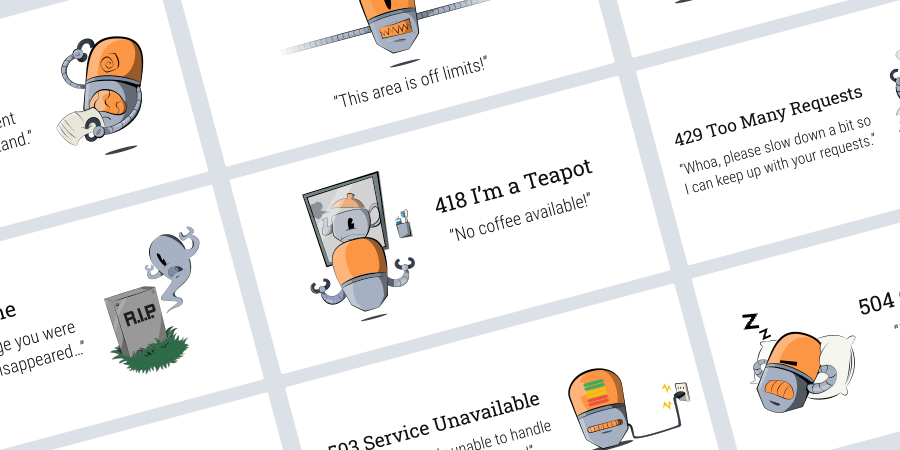
The images are in SVG vector and PNG raster formats. Feel free to use them as is, modify them to your taste, or see them as inspiration for your own creations.


The world of search engine optimization continually evolves and increases in complexity. But one fact stays constant: great backlinks will give you a ranking boost like nothing else.
There are many ways to go about building these links, from guest posting to outright link buying. However, one of the most effective ways of acquiring quality links is also one of the most widely underestimated.

Broken link building has been quietly providing powerful backlinks for savvy online marketers for years. It shows no signs of becoming any less useful, no matter how search engine algorithms may shift in the future.
The basic idea behind broken link building is to find websites linking to pages that have disappeared from the web since the link was published.
Finding these broken links and suggesting your own content as a replacement offers benefits all around. The webmaster fixes a problem and increases value for their visitors. Your website gains a welcome link for relatively little work or expense.
What’s more, pages hosting broken links are usually on aged domains, which means that they pass on more authority. They’ll also often link out to other quality sites in your field, making these links exceptionally desirable from a relevancy standpoint.
This all sounds appetizingly straightforward, but as with most things SEO, the devil is in the details. How can you approach broken link building as a scalable, efficient process rather than merely an interesting concept?
Your first task is to explore your niche for sites containing relevant outbound links. Depending on your sector, these could be informational resource sites, commercial sites with a links page, or even broad-based sites in the Wikipedia mold.
There are many ways to find potential target sites. Here are a few ideas to use as a starting point.
Whichever approach you choose, the aim is to put together a list of domains in your niche that host outbound links. Feed these domains into a broken link checker and compile a list of the outbound links that return an error. Visit the source pages manually to see if they are promising candidates for the next stage in broken link prospecting.
Now that you’ve drawn up a list of broken links, your next step should be to check your own site for potential replacement material. Although you may already have a page that provides an easy drop-in, it’s more likely that you won’t have ready-made content that’s a perfect fit.
This is important. For the broken link technique to work, you need to make it easy for the webmaster of your target website. Your content should slot in neatly and should ideally be of higher quality than the original link target. Usually, this means producing custom content for each individual broken link you discover.
How much time and effort you put into this content creation depends on the value of the potential link you’ll gain. Ultimately, however, producing high-quality content for your site is never a wasted effort, even if not every link request is successful.
If you can find a copy of the original page on the Wayback Machine, then your task will be straightforward. Simply create a like-for-like replacement, while making sure it’s not a straight duplicate. Ideally, you should aim to improve on the original to add extra value.
However, if you have no archived material available to work from, then take your cues from the linking page topic and the context of the link itself. Try to produce an excellent page that will impress your target webmaster, even if your content isn’t a direct match with the original.
Once you’ve created your replacement content and published it on your own site, it’s time to contact the webmaster or owner of your target site. Check the contact page for an email address, social media account, or online contact form you can use to get in touch with the site maintainer.
Next, write a message that’s customized to the site in question. Your aim is to convince the webmaster that linking to your content is an easy way to add value to their site. Stress that they’ll be fixing a broken link problem as well as providing a genuinely useful resource for their visitors.
Be clear, to the point, and polite. Some marketers like to pose as an everyday user pointing out the broken link as a favor. Others prefer a more straightforward approach with no pretense. Either method can work well, but be aware that owners of high-quality sites will likely be inundated with link requests and will rarely show any patience if they spot attempted subterfuge.
Whichever approach you choose, present a short overview of your replacement content and how it’ll help the target site’s users.
If you put together the right combination of quality content and a convincing pitch, you stand an excellent chance of picking up a powerful link from an aged domain, surrounded by links to other quality resources in your niche. This is backlinking gold, and it’s well worth putting in the time and effort necessary to maximize your chances of success.
However, even if each link-hunting expedition doesn’t bear the fruit you’re looking for, you’ll still have developed a piece of content worthy of attracting natural, organic links under its own steam.
A good backlink profile should look as natural as possible, and this means striving for variety. Broken link building offers the tempting chance of a wide array of natural, powerful links that will boost the rankings of any site in any niche.
After relaunching Dr. Link Check (our broken link checker service) last month, we needed some high-res, high-quality screenshots of the website for promotional purposes. Typically, when in need of a quick screenshot I use the nifty Firefox Screenshots feature by right-clicking on the page and choosing Take a screenshot. This time, however, I needed screenshots with a higher pixel density than my non-Retina display supports. After some googling, I found an easy way to take high-DPI screenshots via the Firefox Web Console.
:screenshot --dpr 2This results in a screenshot of the currently visible area being saved to the Downloads folder (with an auto-generated filename in the form of "Screen Shot yyyy-mm-dd at hh.mm.ss.png"). The --dpr 2 argument causes Firefox to use a device-pixel-ratio of 2, capturing the screen at two times the usual resolution.

If you want to take a screenshot of the full page, append --fullpage to the command. Here's the full list of arguments you can use:
--clipboard Copies the screenshot to the clipboard--delay 5 Waits the specified number seconds before taking the screenshot--dpr 2 Uses the specified device-to-pixel ratio for the screenshot--file Saves the screenshot to a file, even if the --clipboard argument is specified--filename screenshot.png Saves the screenshot under the specified filename--fullpage Takes a screenshot of the full page, not just the currently visible area--selector "#id" Takes a screenshot of the element that matches the specified CSS query selectorUnfortunately, there isn't (yet?) a command for taking a screenshot at a specified window or viewport size. A good workaround is to open the page in Responsive Design Mode in Firefox: