A website redesign is not just a visual project. It also requires careful decisions about what happens to the site’s URLs.
Suppose /services/web-design becomes /web-design during the redesign. That change may look minor, but the old URL could still be referenced by third-party websites, users’ bookmarks, search engines, old emails, and other sources outside your control.
The safest approach is to preserve existing URLs wherever possible and plan every necessary change deliberately. In this guide, we’ll do this by building an inventory of the site’s existing URLs, deciding what should happen to each one, implementing the changes, and verifying the results with Dr. Link Check.
Before making any changes to your website, you need to understand exactly what you’re starting with. That means creating a reliable inventory of the URLs that exist today and how they currently behave.
A straightforward way to inventory a website is to crawl it from the outside, much like Googlebot or other search engine crawlers do. Instead of relying on what your CMS, database, or site structure says should exist, the crawler follows the website as it is actually published and builds a list of the URLs it encounters.
Dr. Link Check makes this straightforward. Although it is primarily designed to find broken and malicious links, every scan also produces an All links report containing all the URLs discovered during the crawl.
Go to your Dr. Link Check account at https://www.drlinkcheck.com/account and click the + button to create a new project:
If the site has an XML sitemap, add its URL on a separate line. You can often find the sitemap at a location such as https://www.example.com/sitemap.xml or referenced in the site’s robots.txt file at https://www.example.com/robots.txt.
Adding the XML sitemap helps fill gaps that a normal crawl would miss. For example, a page may still exist and be listed in the sitemap even though no other page on the site links to it. Such pages are commonly called orphan pages. By including the sitemap as an additional crawl source, Dr. Link Check can discover these URLs alongside the pages it finds by following regular <a href> links.
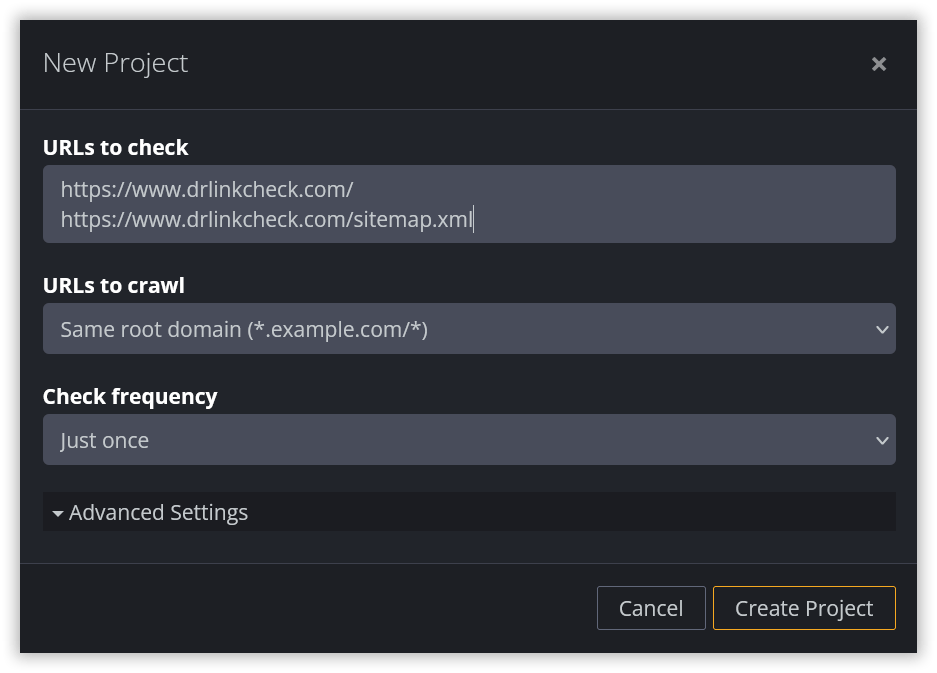
The sitemap may not contain every URL that still matters, though. An old page could have disappeared from both the site’s internal links and its current sitemap while still receiving search traffic, having backlinks, appearing in old emails, or being saved in users’ bookmarks.
If you already know about such URLs, add them to URLs to check as well, one per line. Useful sources can include Google Search Console, analytics, backlink data, older sitemaps, CMS exports, and records from previous campaigns.
The goal is not simply to crawl everything the current site links to. It is to build an inventory of the URLs that may still need to work, redirect, or otherwise be handled deliberately after the redesign.
Under URLs to crawl, select Same root domain if the redesign covers the complete root domain, including its subdomains.
If only one particular domain is being migrated, select Same domain instead. For example, if www.example.com is being redesigned but jobs.example.com and blog.example.com are not, Same domain prevents those other subdomains from being treated as part of the website being crawled.
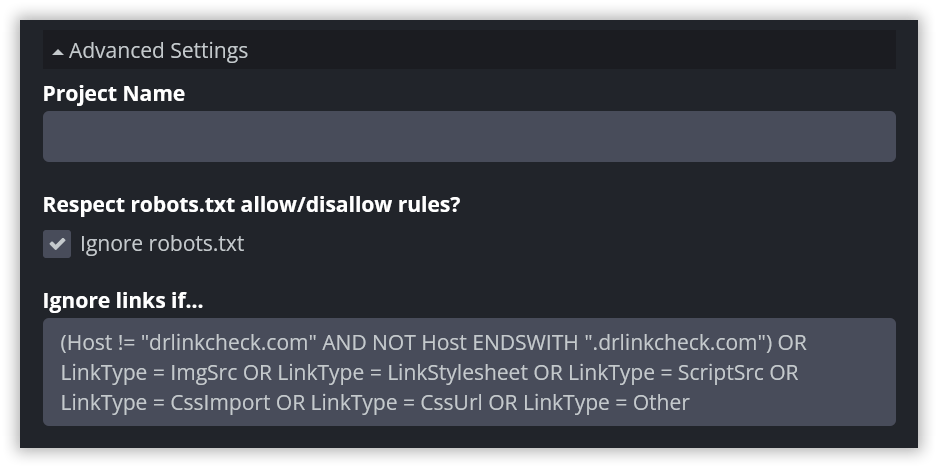
Dr. Link Check normally checks and reports all types of links, which is exactly what you want for a comprehensive broken-link check. For this particular job, however, checking every image, stylesheet, script, and outgoing link may consume a lot of your subscription’s link allowance without making the URL migration inventory more useful.
Under Advanced Settings → Ignore links if…, you can use an ignore rule to remove those links from the check. For a site on example.com, for instance, you can use:
(Host != "example.com" AND NOT Host ENDSWITH ".example.com") OR LinkType = ImgSrc OR LinkType = LinkStylesheet OR LinkType = ScriptSrc OR LinkType = CssImport OR LinkType = CssUrl OR LinkType = Other
Replace example.com with the site’s actual root domain.
This rule removes links outside the root domain along with common image, stylesheet, script, and miscellaneous resource links.
Notice that we’re not simply saying “keep only <a href> links.” Other potentially useful links remain in the report, including URLs found in social media meta tags, meta refresh tags, and XML sitemaps.
This filtering step is optional. If the site is small enough that the additional links aren’t a concern, keeping the broader crawl can be useful. And if files such as images or other resources have URLs that must survive the redesign, make sure your settings don’t exclude the links you actually need to migrate.
Before exporting anything, look through the results. The goal isn’t to audit every link yet. You’re checking whether the crawl looks like a useful representation of the site you’re about to migrate.
Are the main sections of the website present? Are URLs from the sitemap appearing? Are large numbers of irrelevant resources still cluttering the report? Is a subdomain showing up that isn’t part of the redesign?
If something looks wrong, adjust the project settings and rerun the check before continuing.
A redesign doesn’t start with a clean slate. The old site may already contain URLs that redirect elsewhere. Those redirects are worth reviewing before you create the new migration plan. Otherwise, you risk carrying years of accumulated redirect decisions and unnecessary redirect chains into the redesigned site.
In the All links report, click Add in the Filter bar and choose Redirect type.
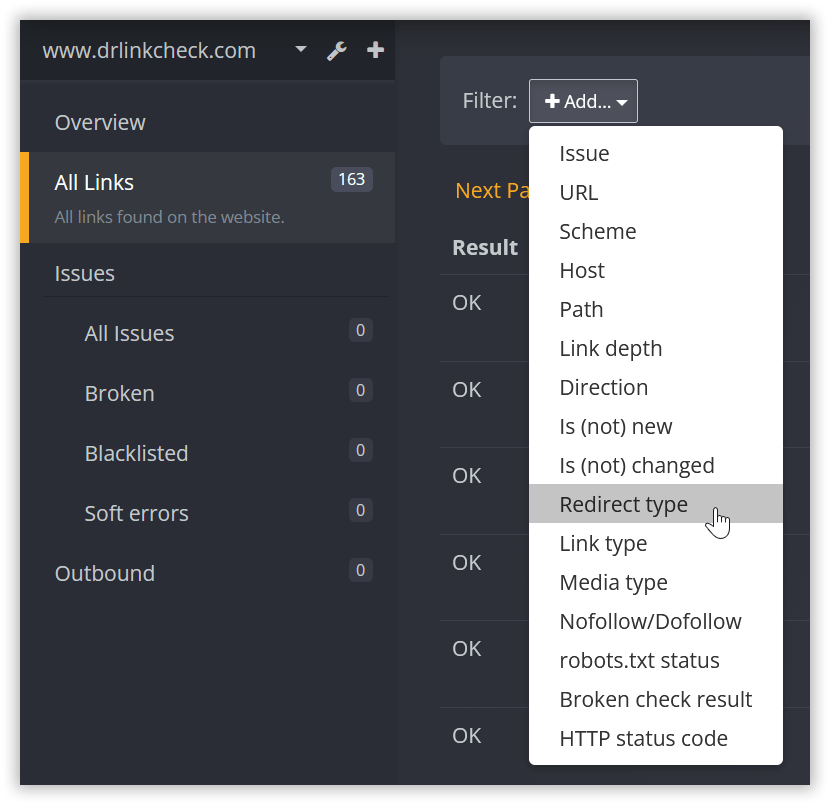
By default, this shows temporary HTTP redirects using status codes 302, 303, or 307. Review these links and check whether the redirect is still intentional.
Then open the drop-down menu next to Redirect type and go through the other available values: Permanent (HTTP), HTTP refresh, Meta refresh, JavaScript, and Frame. For each redirect, inspect both the destination and how the old URL is being used.
When you hover over the Redirect tag next to a link in the report, a tooltip shows how many times the link was redirected. Click Details to see all locations in the redirect chain.
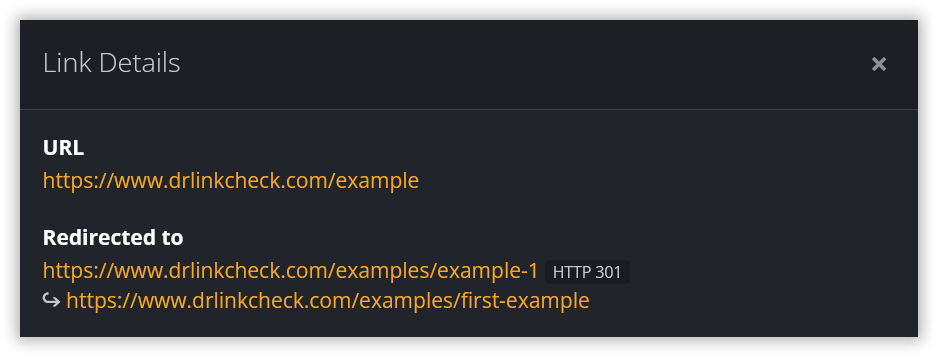
Pay particular attention to long redirect chains. For example:
/seo → /seo-services → /services/seo
Every additional hop adds another dependency that can eventually break. If /services/seo is the intended final destination, there is usually no benefit in preserving the intermediate redirect through /seo-services.
If you find URLs in the redirect chain that are still referenced in bookmarks, old emails, search results, or backlinks, keep redirects for those URLs, but point them directly to the final destination:
/seo → /services/seo
/seo-services → /services/seo
This removes unnecessary hops without breaking old references.
In short: update links you control to point directly to the final URL, while keeping redirects for old references you don’t control.
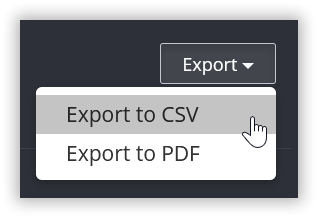
Once you’re satisfied with the crawl, go back to the All links report. Then click Export and select Export to CSV from the drop-down menu.
This will generate a CSV file you can open in Microsoft Excel or other spreadsheet software for further processing. The export contains the URL itself along with information such as the final redirect destination and redirect type, link type, direction, media type, nofollow and noindex information, robots.txt status, and the first source URL where the link was found.
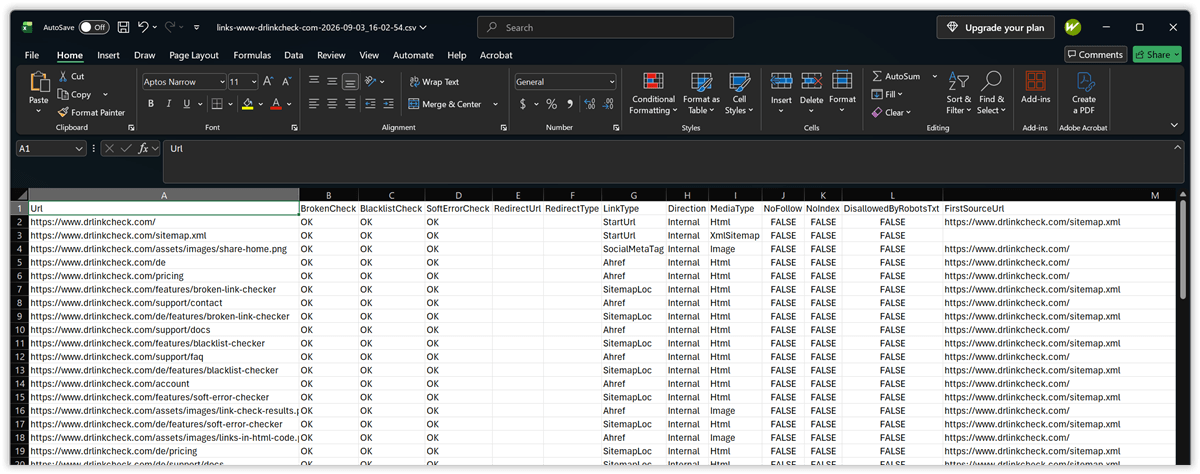
Don’t worry about turning all of that into a migration plan yet. Keep this export as your raw crawl inventory. In the next step, we’ll add the information needed to decide whether each relevant old URL should stay where it is, move somewhere else, be consolidated with another page, or disappear intentionally.
Now that you have an inventory of the existing site, the next step is to decide what should happen to those URLs after the redesign. There is one important rule to start with:
Don’t change a URL just because you’re redesigning the website.
A new design, CMS, navigation structure, or page template doesn’t automatically require a new URL structure. If an existing URL still accurately represents the resource and can continue to work on the new site, keeping it is usually the simplest and safest option.
This isn’t a new idea. In his 1998 W3C note Cool URIs don’t change, Tim Berners-Lee argued that website reorganization is not, by itself, a good reason to change published addresses. Once a URL has been published, you cannot know everywhere it has been referenced: other websites may link to it, users may have bookmarked it, and references may exist completely outside your control. He also argued that public URLs should be kept independent of changeable implementation details such as file locations or server-side technology. More than 25 years later, that principle is just as useful during a website redesign:
Keep the URL if you can. Redirect it if you must.
The Dr. Link Check export already gives you useful information about the existing URL, including whether it currently redirects and where the redirect leads.
For the migration plan, add a few columns of your own. A practical starting point is:
| Old URL | Planned action | New URL | Expected result | Reason |
|---|---|---|---|---|
/website-design |
Keep | /website-design |
200 | URL can remain unchanged |
/seo-services |
Move | /services/seo |
Permanent redirect → 200 | URL structure is changing |
/blog/old-seo-guide |
Consolidate | /guides/seo |
Permanent redirect → 200 | Content merged into new guide |
/summer-offer-2025 |
Remove | — | 404 or 410 | Expired offer, no replacement |
For a large migration, you may also want columns such as Priority, Owner, or Notes.
Later, when we test the redesigned site, we’ll add columns for the actual result and whether the URL passed or failed. For now, concentrate on defining the expected behavior.
The important part is that every relevant URL gets an intentional outcome.
This should be the first option you consider. Suppose the old website has:
https://www.example.com/website-design
The page is being redesigned, perhaps moved into a different CMS and given completely new HTML, but it still represents the company’s website design service. If there is no compelling reason to change the address, keep it. The user doesn’t need to know that the CMS, templates, database structure, navigation, or technology behind the page has changed.
Preserving the URL has several advantages:
In other words, the safest redirect is the one you don’t need.
Don’t take this principle too far, though. Keeping an old URL doesn’t mean you should reuse it for something completely unrelated. The address should still represent substantially the same resource.
Sometimes a URL genuinely has to change. For example:
https://www.example.com/seo-services
might become:
https://www.example.com/services/seo
If the new URL represents the same resource, record the change explicitly in the migration matrix:
Old URL:         /seo-services
Planned action:  Move
New URL:         /services/seo
Expected result: Permanent redirect → 200
The old URL should eventually lead directly to the new one using a permanent HTTP redirect, typically a 301 or 308. But before accepting the change, ask one additional question:
Why does this URL need to change?
If the answer is merely “the new structure looks cleaner,” reconsider whether the benefit is worth introducing a migration.
One useful discipline is to require a reason in the migration matrix for every URL that changes. This turns URL changes from an automatic consequence of a redesign into deliberate decisions.
A website redesign often involves cleaning up old content. Suppose the old site contains the following overlapping articles:
/blog/seo-basics
/blog/seo-tips
/blog/old-seo-guide
and the new site combines the useful material into:
/guides/seo
Those old pages aren’t simply “moving.” Several resources are being consolidated into one. Record that distinction in the migration matrix:
| Old URL | Planned action | New URL |
|---|---|---|
/blog/seo-basics |
Consolidate | /guides/seo |
/blog/seo-tips |
Consolidate | /guides/seo |
/blog/old-seo-guide |
Consolidate | /guides/seo |
The important question is whether the new destination is a genuine replacement for what users expected at the old URL. Don’t redirect a deleted page to the homepage simply to avoid returning a 404.
Some old resources should simply disappear. Imagine:
https://www.example.com/summer-offer-2025
The promotion has ended, there is no equivalent current offer, and there is no useful page that satisfies the same purpose. In that case, the correct migration decision may be:
Planned action:  Remove
New URL:         —
Expected result: 404 or 410
A 404 isn’t automatically a migration failure. An unexpected 404 is a problem. An intentional 404 or 410 for a resource that has been removed without a suitable replacement can be exactly the result you planned.
That distinction will become important when we build the migration tests later. The goal isn’t to make every historical URL return 200 OK somehow. The goal is for every URL to behave as intended.
You don’t have to make every decision on the first pass. If you’re unsure whether a page should survive, whether another page is a suitable replacement, or why an existing redirect exists, mark it as Investigate. For example:
| Old URL | Planned action | Reason |
|---|---|---|
/partners/old-product |
Investigate | Need to confirm whether product still exists |
/help/setup-v1 |
Investigate | Check whether new documentation covers same topic |
This is better than guessing. But treat Investigate as a temporary status. Before launch, every URL that matters should eventually have a defined outcome.
The redirect review from the previous section becomes useful here. Suppose Dr. Link Check showed that:
/seo
already redirects to:
/seo-services
and the redesign will move /seo-services to:
/services/seo
If you simply preserve the existing redirect and add another one, you could end up with:
/seo → /seo-services → /services/seo
Your migration matrix should make the intended final destination clear:
| Old URL | Current redirect | Planned final destination |
|---|---|---|
/seo |
/seo-services |
/services/seo |
/seo-services |
— | /services/seo |
Some URL changes will be unavoidable. When you create a new URL, don’t design it only for the website you have today.
Berners-Lee warned about putting information into URLs that is likely to change: implementation details, software mechanisms, organizational structures, document status, and similar temporary characteristics. His broader point is that the more a public address depends on today’s internal implementation or classification, the more likely you’ll need to change it later.
For example, think carefully before creating URLs that expose details such as:
/cgi-bin/
/wordpress/
/new-site/
/v2/
/old/
/draft/
The exact choices depend on the site, and even apparently descriptive categories can change over time. The useful question is:
Could we reasonably keep this URL if we redesigned the site again five years from now?
A migration is an opportunity not only to repair URLs that have become problematic, but to avoid creating the same problem for the next team.
Your migration matrix now defines what should happen to each old URL. The next step is to put those decisions into practice.
For URLs marked Keep, make sure the redesigned site continues serving the page at exactly the same address. For URLs marked Move or Consolidate, create a permanent redirect to the destination recorded in the matrix. URLs marked Remove should return the intended response rather than being redirected somewhere unrelated.
How you implement this depends on the platform running the site.
On WordPress, redirects can be managed with a plugin such as Redirection. For a small migration, you can enter the old and new paths individually:
Source URL: /seo-services
Target URL: /services/seo
For a larger migration, entering hundreds of mappings manually is unnecessarily error-prone. Redirection can import redirects from CSV, which fits neatly with the migration spreadsheet from the previous section. The basic format is simply:
source URL,target URL
For example:
/seo-services,/services/seo
/old-seo-guide,/guides/seo
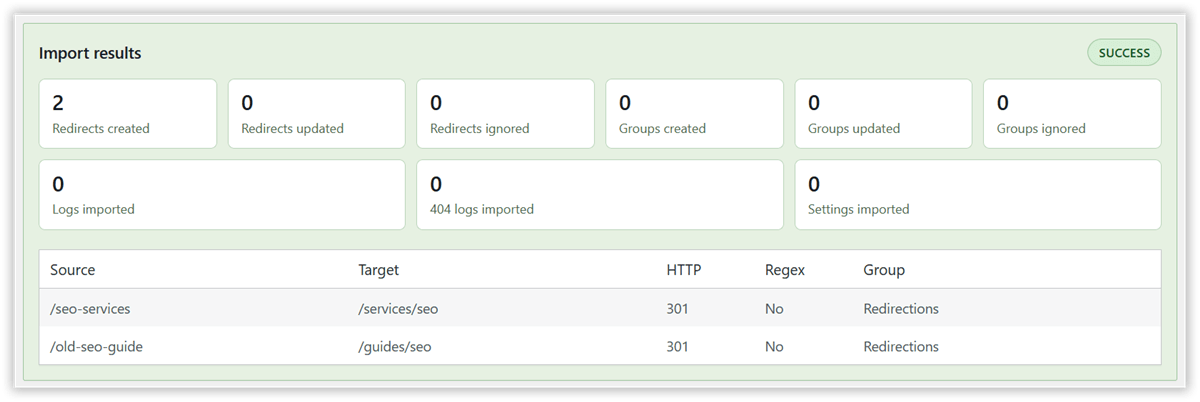
Redirection also supports regular expressions (regex). This is particularly useful when many URLs follow the same old and new pattern.
Suppose an entire section is moving from:
/products/widget-a
/products/widget-b
/products/widget-c
to:
/shop/widget-a
/shop/widget-b
/shop/widget-c
Instead of creating a separate redirect for every product, you could enable Redirection’s Regex option and use:
Source URL: ^/products/(.*)
Target URL: /shop/$1
Here, (.*) captures everything following /products/, and $1 inserts that captured part into the new URL. So:
/products/widget-a → /shop/widget-a
/products/widget-b → /shop/widget-b
A single redirect can therefore replace hundreds or thousands of individual mappings when the URL transformation is genuinely systematic.
Regex can also handle transformations such as removing an old file extension. For example:
Source URL: ^/guides/(.*?)\.html$
Target URL: /guides/$1/
would turn:
/guides/seo.html → /guides/seo/
The power of regex is also what makes it risky. Before replacing a large group of explicit mappings with one pattern, compare the rule against your migration matrix and look for exceptions. If most URLs under /products/ move to /shop/, but /products/documentation and /products/compare have different destinations, a blanket pattern would redirect them incorrectly.
Make your patterns as specific as necessary. Anchors such as ^ and $ can help restrict where a match begins and ends, and can also prevent rules from unexpectedly matching their own destination and creating redirect loops.
Also check how query parameters, trailing slashes, and letter case should be handled. Redirection provides options for these, while regex rules require you to account for some of these details yourself.
For a migration, the safest approach is usually a combination: use explicit redirects for exceptional URLs and regex rules for transformations that are truly consistent.
.htaccessIf the website runs on Apache and .htaccess is available, simple redirects can be implemented with Apache’s Redirect directive:
Redirect 301 "/seo-services" "/services/seo"
Apache’s documentation recommends mod_alias, which provides Redirect, for simple URL redirections; more complicated transformations can use mod_rewrite.
There is one detail worth knowing before adding hundreds of rules: Redirect performs prefix matching. This rule:
Redirect 301 "/products" "/shop"
doesn’t apply only to /products. A request for:
/products/widget-a
will also match, with the remainder of the path appended to the new destination. That can be exactly what you want when an entire section moves. It can also produce unintended redirects if some URLs under /products have different destinations.
If you want an exact match, a regular-expression rule makes that explicit:
RedirectMatch 301 "^/seo-services$" "/services/seo"
Also pay attention to rule order. When multiple Redirect or RedirectMatch directives in the same context could apply, Apache processes them in order and the first match takes precedence. More specific rules should therefore normally appear before broader ones.
With Nginx, an individual exact redirect can be expressed with an exact-match location:
location = /seo-services {
    return 301 /services/seo;
}
The return directive can send a 301 redirect, while the = modifier makes the location match that particular URI exactly.
For redirects based on patterns, Nginx also provides rewrite functionality.
For large migrations, pattern-based redirects and bulk replacements can save a lot of work. But a rule that is correct for most URLs can still send important exceptions to the wrong place.
Suppose most product URLs move like this:
/products/widget-a → /shop/widget-a
Before applying the same rule to everything under /products/, test variations such as:
/products/widget-a?ref=newsletter
/products/widget-a/
/Products/widget-a
/products/documentation
These raise different questions: Should query parameters be preserved? Should URLs with and without a trailing slash behave the same way? Is matching case-sensitive? And is /products/documentation really supposed to become /shop/documentation?
Also watch for overlapping rules. For example:
/products/documentation → /docs/
/products/*             → /shop/*
Both could match /products/documentation, so make sure the more specific exception is handled correctly.
Once the redesigned site is ready, it’s time to verify that the migration actually behaves as planned. There are two different tests to run:
You need both. A crawl of the new site cannot tell you what happened to an old URL that is no longer linked anywhere.
In Section 1, you crawled the existing website to establish a baseline. Now repeat that process for the redesigned site, ideally while it is still on staging. Use the same crawl scope, but remove or adjust any inventory-specific ignore rule so the new crawl includes the resources and outbound links you want to test.
Review the results for any problems introduced during the redesign, including broken internal links, missing images or downloads, redirect loops or chains, and links that still point to redirected URLs.
After making corrections, rerun the check until the remaining issues are understood and intentional.
The site crawl only checks URLs that Dr. Link Check discovers while crawling the redesigned site. Your migration matrix contains another important group: old URLs that may no longer be linked anywhere. Those URLs still need to be tested.
Copy the Old URL column from your migration spreadsheet, then create a separate Dr. Link Check project:
Selecting None for URLs to crawl is important. It tells Dr. Link Check to check only the URLs you supplied rather than following links and crawling the sites they lead to.
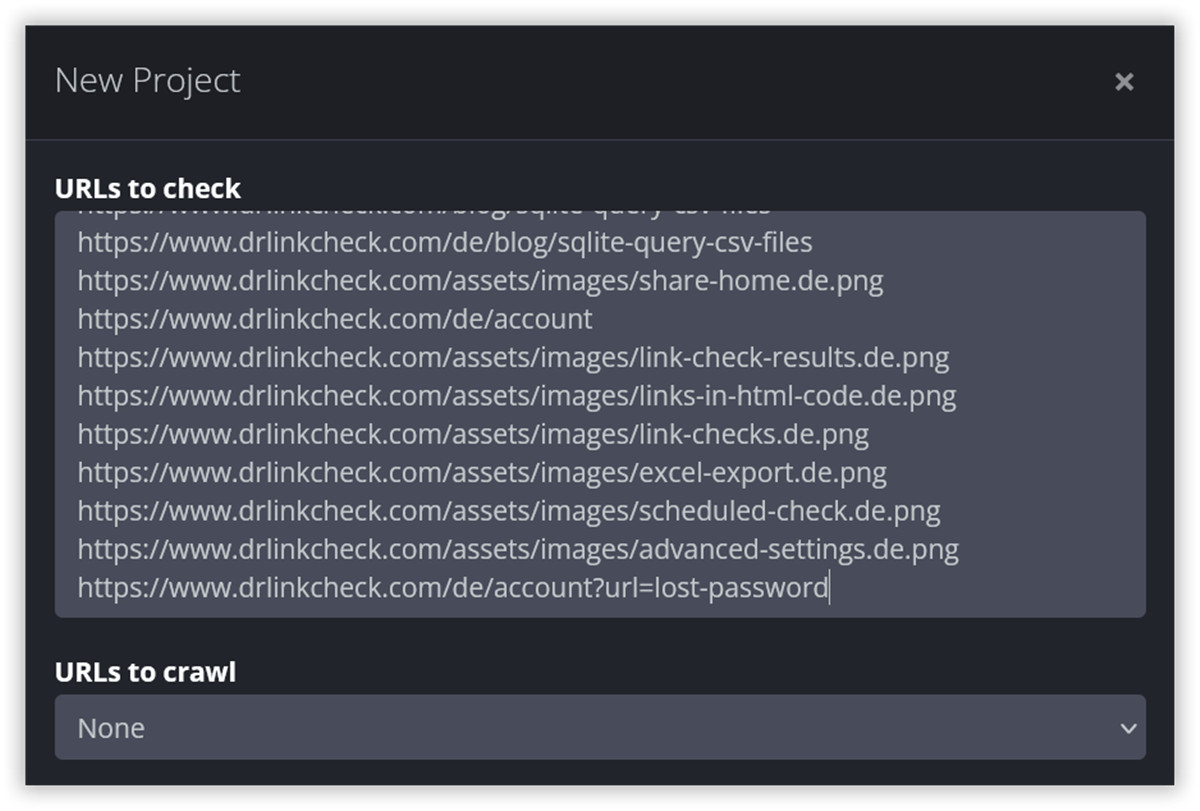
Once the check finishes, compare the actual results with the expected behavior in your migration matrix. For example:
| Old URL | Expected result | Actual result | Test |
|---|---|---|---|
/website-design |
200, no redirect | 200 | Pass |
/seo-services |
Permanent redirect to /services/seo |
Permanent redirect to /services/seo |
Pass |
/old-seo-guide |
Permanent redirect to /guides/seo |
Redirects to /blog, then /guides/seo |
Fail |
/summer-offer-2025 |
404 or 410 | 404 | Pass |
Add columns such as Actual result, Actual destination, and Pass/Fail to the migration matrix if you haven’t already.
The important point is that a migration test asks a different question from an ordinary broken-link check. A 404 isn’t necessarily a failure. If /summer-offer-2025 was deliberately removed and your migration plan specifies a 404 or 410, that result is correct. Likewise, a URL isn’t necessarily a success just because it eventually loads a working page. If you expected:
/seo-services → /services/seo
but actually get:
/seo-services → /services → /services/seo
the final page works, but the migration test should still fail because an unnecessary redirect was introduced. The standard is not simply “Does this URL work?” It is: “Does this URL behave exactly as we planned?”
Even if everything passes on staging, repeat the tests after the redesigned site goes live. Production may use different web server rules, CDN configuration, caching, domain settings, or other infrastructure that wasn’t present on staging. At minimum:
It is also worth checking again after the site has been live for a while. Analytics, Search Console, server logs, support requests, or other sources may reveal old URLs that weren’t in your original inventory. Add those URLs to the migration matrix, decide what should happen to them, and test them in the same way.
At that point, the migration matrix is no longer just a planning document. It has become a repeatable test suite for proving that the old and new URL structures connect exactly as intended.
Preventing broken links during a website redesign is less about fixing 404s after launch and more about controlling what happens to every important old URL.
Start with a reliable inventory, keep URLs unchanged wherever possible, define an explicit outcome for URLs that do change, implement redirects carefully, and then test the results against your migration matrix.
Dr. Link Check can support that process at several stages: inventorying the old site, reviewing existing redirects, checking the redesigned site for broken or redirected links, and mass testing old URLs after the migration.
The key is to treat the redesign as a testable URL migration, not just a visual or technical rebuild. If you know what each old URL is supposed to do and verify that it actually does it, you greatly reduce the risk of broken links, unnecessary redirect chains, and forgotten URLs slipping through the redesign.
Dr. Link Check lets you export link reports in CSV format so you can analyze the results using third-party tools.
One of our larger customers recently asked why he couldn’t open and analyze his CSV export file in Microsoft Excel. I explained that Excel has a limit of 1,048,576 rows, which means it can’t handle CSV files that go beyond that number. My suggestion was to either use a dedicated CSV viewer or, even better, import the CSV file into a database and work with it using SQL.
In this post, I’ll walk you through how to create an SQLite database, import a CSV file, and run SQL queries to get the data you need. SQLite is a lightweight and powerful database engine that’s easy to set up and free to use.
To keep things simple, I’ll be using SQLiteStudio as a graphical client for working with SQLite. It’s much easier than using the command line, especially when you want features like a visual schema editor, a spreadsheet-style data browser, and a built-in SQL editor with autocomplete.
Go to sqlitestudio.pl and click the Download button. SQLiteStudio is free and available for Windows, macOS, and Linux. It comes with SQLite bundled in, so there’s nothing else you need to install.
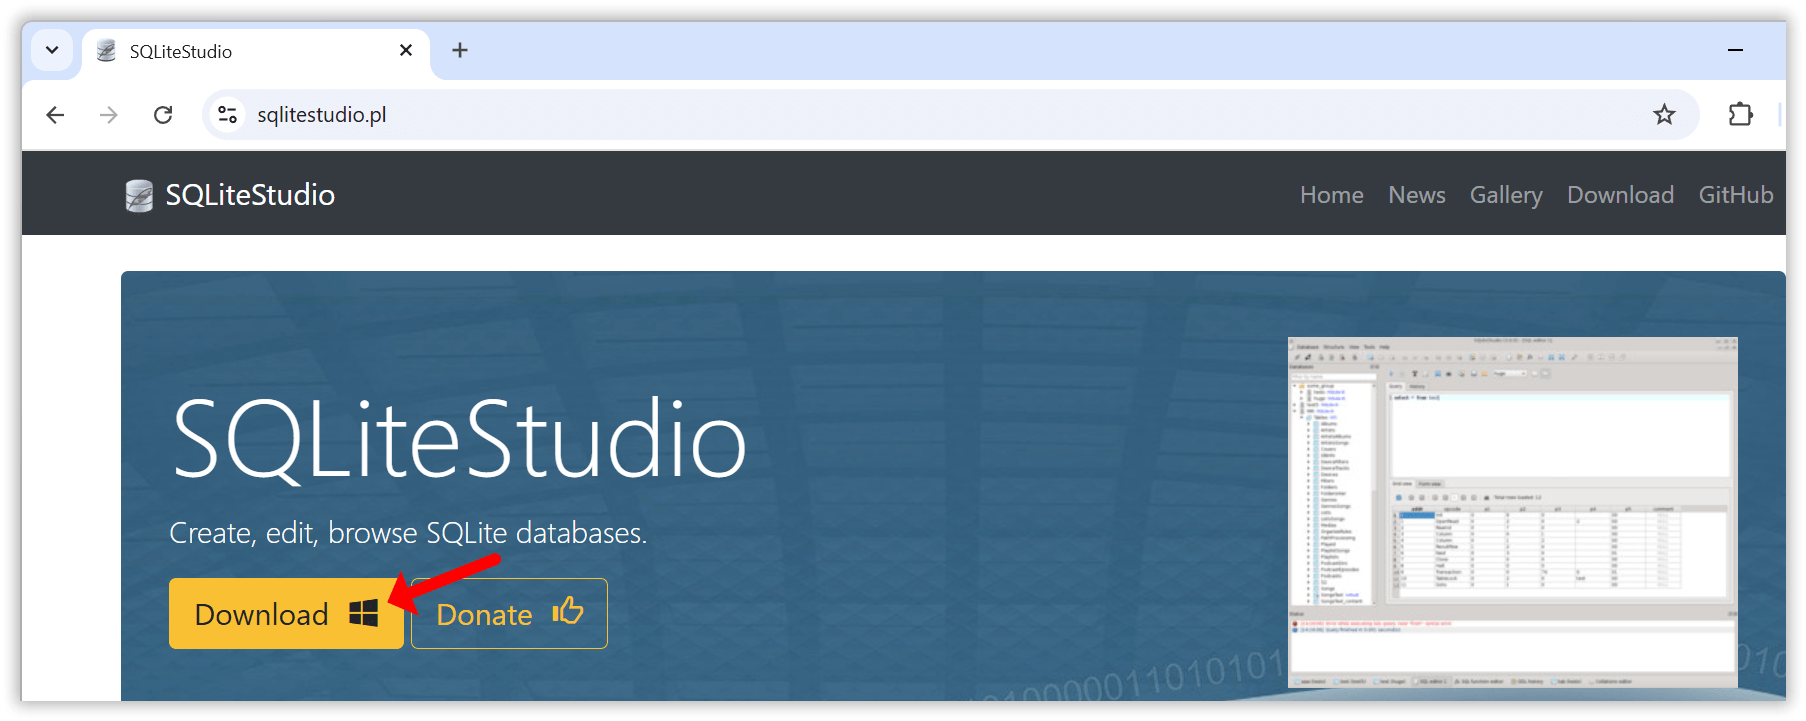
Once the installation is complete, launch SQLiteStudio to get started.
The first step is to create a new database file.
Click the Add a database button in the toolbar.

In the dialog that opens, click the green Create a new database file button. Choose a folder where you want to save the database, then enter a filename (for example, test.db).

Click OK to finish. Your new SQLite database is now ready to use.
Double click the database entry in the Databases tree to establish a connection to the database.
With your database created and opened, the next step is to import your CSV data into a new table.
Open the Tools menu and select Import.

In the import wizard, enter a name for the new table. For example, you can name it export, then click Next to continue.

Select your CSV file and review the import settings. If the data does not line up correctly, try changing the Field separator setting. Some files use commas, while others may use semicolons depending on how they were generated.

Click Finish to begin the import. Once it is complete, the new table will appear under Tables in the database tree on the left.

You can now start querying your data using SQL. Go to the Tools menu and choose Open SQL editor. This opens a new window where you can enter SQL statements. To run a statement, click the blue Execute command button at the top.

For the following examples, I’ll assume that you created a table named export from a CSV file exported using Dr. Link Check’s Export to CSV feature.
Let’s start simple by querying all URLs that, according to Dr. Link Check, returned a 404 error:
SELECT *
FROM export
WHERE BrokenCheck = '404 Not found';

The next example returns all links with any issues, ordered by URL:
SELECT *
FROM export
WHERE BrokenCheck <> 'OK' OR BlacklistCheck <> 'OK' OR ParkedDomainCheck <> 'OK'
ORDER BY Url;
If you want to query all internal links that were permanently redirected, use this SQL statement:
SELECT *
FROM export
WHERE Direction = 'Internal' AND RedirectType = 'Permanent';
Using the LIKE operator, you can get all mailto: links:
SELECT *
FROM export
WHERE Url LIKE 'mailto:%';
With a GROUP BY clause, you can get all URL schemes and the count for each scheme in descending order:
SELECT substr(Url, 0, instr(Url, ':')) AS scheme, count(*) as count
FROM export
WHERE scheme <> ''
GROUP BY scheme
ORDER BY count DESC;
Another useful query returns all non-secure http:// links that redirect to the same URL using the https:// scheme:
SELECT *
FROM export
WHERE Url LIKE 'http://%' AND RedirectUrl = 'https://' || substr(RedirectUrl, length('https://') + 1);
Now it gets a bit more advanced. The following query counts the number of links by file extension:
SELECT
    -- Everything right to the last dot in the URL
    lower(substr(url_without_query_string, length(rtrim(url_without_query_string, replace(url_without_query_string, '.', ''))) + 1)) AS file_ext,
    count(*) as count
FROM (
    -- Remove query string from URL
    SELECT CASE WHEN instr(url, '?') > 0 THEN substr(url, 0, instr(url, '?')) ELSE url END AS url_without_query_string
    FROM export
    WHERE url REGEXP '^(https?|ftp)://'  -- Only query http://, https://, and ftp:// URLs
)
WHERE file_ext <> '' AND instr(file_ext, '/') = 0
GROUP BY file_ext
ORDER BY count DESC;
The last practical example allows you to compare the results of two exports and find which URLs were added or removed. This assumes that you imported the first export into a table called export_a and the second into a table called export_b:
SELECT 'Removed' as action, a.url
FROM export_a a
LEFT JOIN export_b b ON b.url = a.url
WHERE b.url IS NULL
UNION ALL
SELECT 'Added' as action, b.url
FROM export_b b
LEFT JOIN export_a a ON a.url = b.url
WHERE a.url IS NULL;
If you are new to SQL, visit sql-easy.com for a short, interactive course that covers the basics.
SQLite is a powerful tool for working with CSV files, especially when you need to handle large datasets that other tools like Excel cannot manage. When paired with SQLiteStudio as a graphical front end, it becomes easy to set up and use.
If you are exporting reports from Dr. Link Check and want more control over how you filter, sort, or analyze the data, give this workflow a try.
Links are the backbone of the web and play an essential role in SEO and how well a website ranks in search engines like Google or Bing. Based on their destination, links can be classified into three categories, each serving its own purpose:
Together, these links form what’s known as a website’s “link profile.” While each link type plays an important role in shaping this profile, this post will focus on outbound links.
So why exactly do outbound links matter so much? They’re essential for building your website’s credibility. By linking to trustworthy, relevant sources, you show readers that your content is well-researched and backed by reliable references. This helps establish your site as an authority. Outbound links also improve the user experience by giving readers quick access to related information without making them search elsewhere.
From an SEO standpoint, links to authoritative sites signal quality and relevance, which can positively impact search rankings. But remember, not all outbound links are created equal. Links to low-quality or even malicious sites can harm your site’s reputation, and broken links can frustrate users and affect SEO. Since links may break over time or lead to unexpected content if a domain changes hands, it’s essential to regularly check and update outbound links to keep them valuable and trustworthy.
An easy way to keep track of your outbound links is by using Dr. Link Check, a powerful and user-friendly link-checking tool. While Dr. Link Check is primarily designed to find broken links, it’s also excellent for getting an overview of all links on your site, including outbound (external) links.
To get started with Dr. Link Check, visit https://www.drlinkcheck.com/, enter your website’s URL in the text box, and click the Start Check button.

The service will begin crawling your website, starting from the homepage, and will continue until it either reaches the limit of your plan or exhausts all available links. The free “Lite” plan allows crawling of up to 1,500 links, which is sufficient for many smaller websites.
Once the crawl is complete, Dr. Link Check provides several reports accessible from the left-hand sidebar. Since we are only interested in outbound links, select Outbound from the sidebar.

The report may include a variety of link types beyond standard hyperlinks, such as script links (<script src="...">), image links (<img src="...">), and other resource links that may not be relevant to you. To refine the report to display only the links you want, go to the Filter section at the top of the report and select Add → Link Type.

If you plan to check outbound links regularly (which is highly recommended), you can save this customized filter by clicking Save as Custom Report…. This will add a new item to your sidebar for easy access.
Alternatively, if you’d prefer to filter out resource links during the crawl itself, you can instruct the crawler to ignore all links except standard anchor (<a href="...">) links in your HTML code. Note that this option is only available with a paid subscription, starting with the “Standard” plan. To apply this setting, open the Project Settings dialog, expand Advanced Settings, and enter the following rule under Ignore links if…:
HtmlElement != "a"

Once you rerun the crawl, the Outbound report will only display outbound <a> links.
Managing outbound links is key to maintaining your website’s credibility, user experience, and SEO health. With Dr. Link Check, staying on top of these links is simple and efficient. Regular checks ensure that your site remains a reliable resource for both visitors and search engines alike.
In this article, we’ll explore how you can use Dr. Link Check to check the status of multiple URLs or domain names in bulk, without having to manually visit each site.
Go to the sign up page to create a new account (or log in, if you already have one).
Click the Add Project button and paste (or enter) your list of URLs into the URLs to check field (the textbox expands automatically):

The free Lite subscription allows you to check up to 1,500 URLs, while a paid subscription enables you to enter 10,000 URLs at once. If you enter domain names without a protocol (such as http or https), Dr. Link Check automatically prepends them with “http://” to turn them into a valid URL.
As you only want to check the status of single URLs without having Dr. Link Check crawl any linked pages, make sure that URLs to crawl is set to None as shown in the screenshot above.
Now hit the Create Project button to start the check. You will be redirected to the Overview report that gives you a summary of the results.

If you want to see which of the links in your list are broken, select the All Issues report from the sidebar on the left.

Getting a report of links that actually work and are not dead is slightly more challenging. Select the All Links tab from the sidebar and click on Add… in the Filter bar:

Now select Broken check result from the filter list and change Host not found to OK.

Starting with the Professional plan, you can also export your report to CSV format for import into Excel or other spreadsheet software.

In addition to analyzing all links on a single website, Dr. Link Check also enables you to efficiently mass check a list of URLs for dead links. This saves you a significant amount of time and resources compared to manual checks.
A soft 404 is a type of error where a web server returns a 200 OK status code (indicating that the request succeeded), even though the delivered page doesn’t contain the expected content, and a 404 Not Found status would have been the appropriate response.
Think of a page with no or very little content, a page with an error message, or a search results page without any results – that’s what a soft 404 error looks like to you in the browser, despite the server sending a status code 200 in the HTTP response headers as if there were no problem.
Soft 404 errors create a bad user experience, just like regular 404 errors. Clicking on a link, waiting for the page to load, and then not finding the expected content is frustrating and gravely damages the website’s credibility.
It can also impact the site’s search rankings if users encounter a soft 404 and quickly leave the page. Bounce Rate and Time on Page are two important metrics that influence a website’s SEO performance and signal to search engines how relevant and valuable the content is. In addition, soft 404s consume valuable crawl resources, causing search engines to continue crawling unimportant pages instead of important ones, leading to a reduced frequency of crawls, decreased indexation, and ultimately, a negative impact on the website’s search visibility.
Detecting soft 404 errors is tricky. You can’t trust the HTTP status code returned by the server but have to examine the page content. Standard link checkers don’t do this and therefore fail to identify soft 404s.
Our link checking solution, on the other hand, can rely on a large database of content patterns to automatically identify different kinds of soft 404s on a website. Starting with the Professional plan, detected soft errors are reported under the “Soft errors” tab in the sidebar.

An alternative (and free) way to identify at least some of the soft 404 errors is to check out the site’s “Indexing → Pages” report in Google Search Console. This report lists crawl errors, including soft 404s, that Google encountered when indexing your pages.

Another resource you should take a look at is your website’s analytics data. Try finding pages with particularly high bounce rates or low time-on-page values as these are indicators of soft 404 errors.
Last but not least, verify that your server actually sends a 404 status code if a non-existent resource is requested:
404 Not Found error (such as https://www.example.com/this-page-does-not-exist).Control + Shift + I on Windows or Linux, Command + Option + I on macOS).Control + R (or Command + R on macOS) to reload the page.
If the request was not redirected to a different URL and the server responded with code 200, you have stumbled upon a soft 404 error.
Soft 404 errors are frequently the result of an incorrect server configuration or a programming error. Here are two real-life examples:
A website hosted on an Apache web server had a line similar to this in its .htaccess file to configure a custom 404 error page:
htaccess
ErrorDocument 404 https://www.example.com/404.html
Instead of serving the content of the 404.html file directly, the server redirected to the URL https://www.example.com/404.html and returned the 404.html file with a 200 OK status. Changing the line to
htaccess
ErrorDocument 404 /404.html
fixed the issue.
In a different case, a website had a custom “404 Not Found” page with the following PHP code at the top:
php+HTML
<?php header("Status: 200 OK"); ?>
This line resulted in 200 OK being sent instead of the correct 404 code.
Sometimes soft 404s are also remnants of changed website structures or removed content. Products that are no longer available may result in empty search result pages or moved blog posts in empty categories. In situations like these, it can be a good idea to just remove the empty pages or the links pointing to them.
If that’s not possible or practical, you can restrict search engines from indexing the pages by adding a disallow rule to your site’s robots.txt file or including a meta robots tag with the parameter “noindex” (<meta name="robots" content="noindex">) in your pages’ HTML code.
Soft 404 errors can significantly impact a website’s user experience and search engine visibility. Website owners can identify these errors through the use of tools such as Dr. Link Check and Google Search Console and by carefully examining the website’s analytics. Resolving soft 404s may involve reviewing the server’s configuration files and delving into the website’s source code.
When you’re sifting through your website analytics, one of the most important metrics you’ll find is your bounce rate. Bounce rate refers to the rate of visitors that leave your website after a single page visit. This generally means that they didn’t find the page interesting enough to continue browsing your site, let alone buy anything from your business.
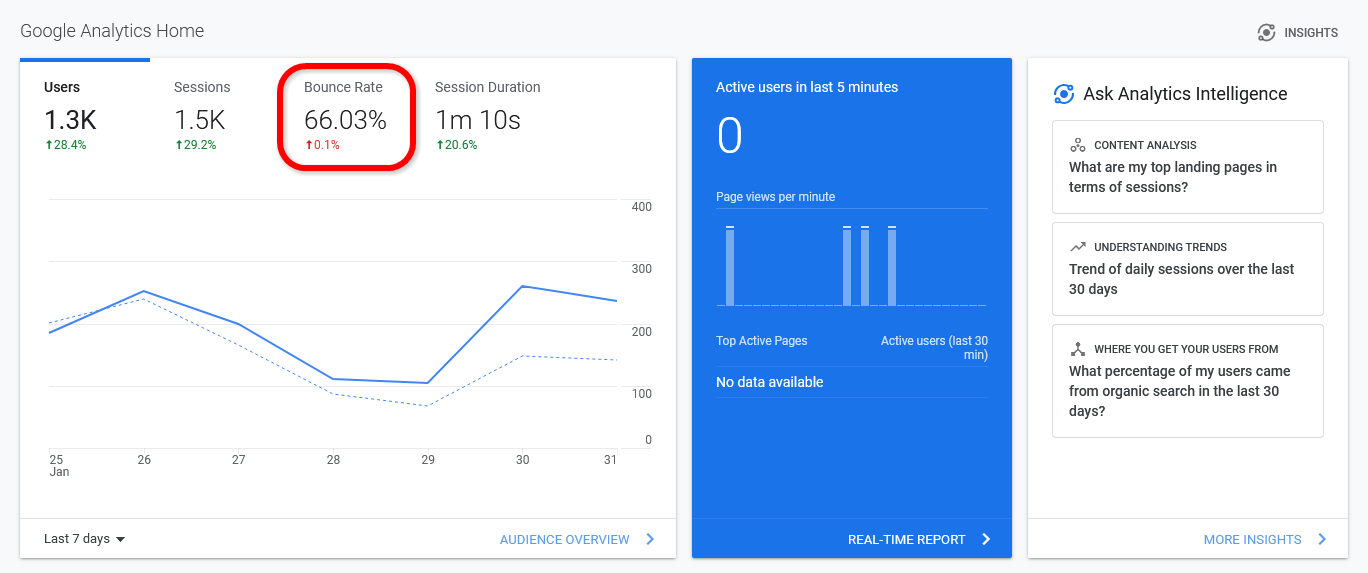
Entrepreneurs should always look for ways to lower the bounce rate of their web pages. After all, a lower bounce rate means that visitors are spending more time browsing your content and your online store, which will lead to more customer conversions and more sales. Fortunately, you can use many smart strategies to reduce your bounce rate and keep visitors around for longer. Here are 11 ways to lower your bounce rate and increase session duration.
Improving the loading speed of your website is one of the best things you can do. This simple change can almost instantly reduce your bounce rate, increase the average session duration of viewers, and enhance your search engine rankings. Of course, this will also have a positive impact on how people react to your website and how many viewers turn into customers.
Tricks such as compressing your content, minimizing HTTPS requests, and allowing asynchronous loading for certain files can help speed up your website. It’s also important to get high-quality hosting. However, to ensure that your website is as efficient as possible, you might want to ask a professional web developer to help you out. Even a 1-second increase in the average loading time can have a significant impact on session duration and conversions.
Another way to reduce your bounce rate and keep visitors around longer is to make your website easier to navigate. If people can’t instantly find what they need on your website, they’re likely to get frustrated and leave. As such, you’ll want to ensure that everything is easy to find and that potential customers have no problem finding what they’re looking for.
Many websites handle this by using large navigation buttons for important parts of their website, such as their online shop and their FAQ page. Providing internal links between pages to link people to things they might be interested in can also help. Asking people to test your website for usability can help you tackle potential problems and improve the ease of navigation.
Encountering a page with missing images or a “404 Not Found” message when clicking on a link is an immediate turnoff for many visitors. Errors like these make your site look unprofessional and unmaintained.
Use our broken link checker service to identify dead links and fix them before they affect your reputation and drive away potential customers.
Sometimes keeping visitors on your website is all about aesthetics. If someone visits your site and finds that it looks like a website from the 1990s, they’ll probably think that your business is old and outdated. Even though less is more sometimes, a visually unappealing website can cause visitors to swiftly leave.
While your website doesn’t need to be too ostentatious, a few visual upgrades and an attractive template can go a long way. You might even want to ask a web design service to help you make your website look as good as possible while still ensuring that it loads fast and is easy to navigate.
Using internal links throughout your website has all kinds of benefits. Internal links can help you improve your Google ranking for certain keywords, which will help you gain more visitors. What’s more, if you use internal linking appropriately, visitors are much more likely to click on these links and keep exploring your website, leading to a huge reduction in your bounce rate.
You should use internal links in your blog posts to link relevant keywords to other helpful pages on your website. You should also include a call-to-action (CTA) on each page that leads viewers to your online store. Adding internal links between relevant products in your online store can also help you keep users browsing and boost your customer conversions.
Adding some enticing interactive content to your blog posts is an excellent way to increase the average session duration of visitors to your website. After all, people will naturally stay on your website longer if they’re watching a video, doing a quiz, or exploring a fascinating interactive infographic.
These features can also help you reduce your bounce rate. When your blog posts offer engaging features like videos, quizzes, and infographics, people will get invested and read more of your content. You can even enhance your sales by using these interactive features to lead people to your online store and including some interactive content on your product pages.
One of the biggest causes of high bounce rates is websites that aren’t mobile-friendly. Many consumers nowadays use their smartphones, tablets, and other portable devices to browse the internet. If your website doesn’t cater to these devices, you’ll lose tons of visitors who would simply rather use a website they can read and browse on their phone.
Making your website more mobile-friendly involves enhancing your layout, making text readable on small devices, and breaking content into small paragraphs to make it easier to read. Once again, you might want to ask a professional web design service for help to make your website more mobile-friendly, especially as it’ll boost session duration and reduce your bounce rate.
If you want to turn more of your website viewers into customers, you need to make sure your online store is fun, appealing, and easy to navigate. The more time people spend browsing your online store, the more likely they are to ultimately buy from you. Naturally, this will also have a great impact on your bounce rate and session duration.
There are a few tricks you can use to keep people engaged in your online store. Adding image links to related products on every product page can catch the attention of viewers. You should also include high-quality product images and even product videos to demonstrate your products. You should make sure your product pages load fast and are easy to navigate on all devices. Including large “Buy Now” or “Add to Cart” buttons can also help boost sales.
Some websites blast visitors with unwanted pop-ups as soon as they visit. Between advertisements, pop-up boxes asking them to accept all cookies, and requests to sign up to an email list, visitors can become frustrated, and these features may cause them to instantly leave a website. As such, you’ll want to avoid them as much as possible.
While you need to ask visitors to accept cookies, you should do so with a small footer rather than a huge pop-up box. You should also avoid big, annoying ads in favor of organic links in your content. Instead of using pop-up boxes to ask people to join your mailing list or check out your products, add these CTAs to your blog pages or somewhere on your website where they’re less obtrusive.
Collecting feedback from website visitors is one of the best ways to improve your website. This helps you instantly discover and solve problems with your website usability. For instance, you might find out that mobile users find it hard to browse your website. You can then work on making your website easier to browse on portable devices.
By finding and tackling these problems, you can impress more viewers, resulting in a lower bounce rate and higher average session duration. You might want to send out feedback surveys to your customers to ask them how easy it was to use your website. You could also pay for usability testing, where impartial testers thoroughly test your website and give you tips on how to improve its usability.
Encouraging visitors to stick around longer on your product pages is one of the best things you can do. The more time they spend browsing your products, the more likely they are to ultimately buy something. As such, you’ll want to optimize your product pages as much as possible to prevent visitors from leaving.
High-quality images of your products can help. Offer pictures from every angle so customers can check out each product thoroughly. Product videos can also help, especially as these can make visitors invest a few minutes into discovering more about each product. Detailed product descriptions and product reviews can also keep people reading and entice them to make a purchase.
If you want to boost your Google search ranking and enhance your sales, lowering your bounce rate and increasing your average session duration can help. By focusing on these analytics and improving them, you’ll keep people around on your website much longer. This will result in a higher rate of customer conversions as well as a significant boost in future traffic.
These 11 strategies can help you significantly improve these analytics and enhance the success of your website. Not only can these tips help online businesses make more sales, but even if you’re not trying to sell anything, decreasing your bounce rate can help you bring more visitors to your site and build a bigger following.