A website redesign is not just a visual project. It also requires careful decisions about what happens to the site’s URLs.
Suppose /services/web-design becomes /web-design during the redesign. That change may look minor, but the old URL could still be referenced by third-party websites, users’ bookmarks, search engines, old emails, and other sources outside your control.
The safest approach is to preserve existing URLs wherever possible and plan every necessary change deliberately. In this guide, we’ll do this by building an inventory of the site’s existing URLs, deciding what should happen to each one, implementing the changes, and verifying the results with Dr. Link Check.
Before making any changes to your website, you need to understand exactly what you’re starting with. That means creating a reliable inventory of the URLs that exist today and how they currently behave.
A straightforward way to inventory a website is to crawl it from the outside, much like Googlebot or other search engine crawlers do. Instead of relying on what your CMS, database, or site structure says should exist, the crawler follows the website as it is actually published and builds a list of the URLs it encounters.
Dr. Link Check makes this straightforward. Although it is primarily designed to find broken and malicious links, every scan also produces an All links report containing all the URLs discovered during the crawl.
Go to your Dr. Link Check account at https://www.drlinkcheck.com/account and click the + button to create a new project:
If the site has an XML sitemap, add its URL on a separate line. You can often find the sitemap at a location such as https://www.example.com/sitemap.xml or referenced in the site’s robots.txt file at https://www.example.com/robots.txt.
Adding the XML sitemap helps fill gaps that a normal crawl would miss. For example, a page may still exist and be listed in the sitemap even though no other page on the site links to it. Such pages are commonly called orphan pages. By including the sitemap as an additional crawl source, Dr. Link Check can discover these URLs alongside the pages it finds by following regular <a href> links.
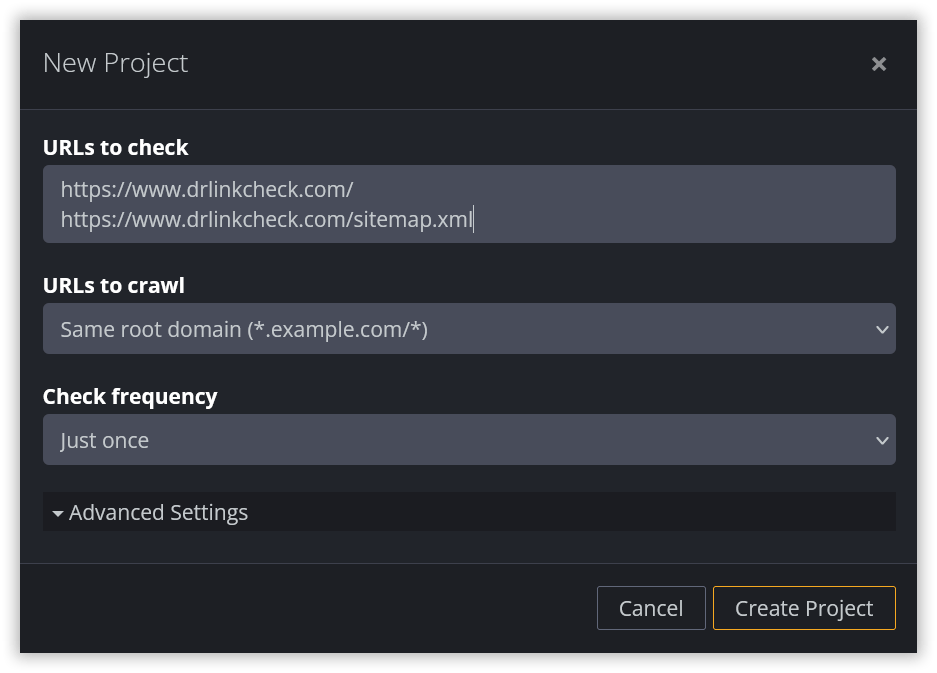
The sitemap may not contain every URL that still matters, though. An old page could have disappeared from both the site’s internal links and its current sitemap while still receiving search traffic, having backlinks, appearing in old emails, or being saved in users’ bookmarks.
If you already know about such URLs, add them to URLs to check as well, one per line. Useful sources can include Google Search Console, analytics, backlink data, older sitemaps, CMS exports, and records from previous campaigns.
The goal is not simply to crawl everything the current site links to. It is to build an inventory of the URLs that may still need to work, redirect, or otherwise be handled deliberately after the redesign.
Under URLs to crawl, select Same root domain if the redesign covers the complete root domain, including its subdomains.
If only one particular domain is being migrated, select Same domain instead. For example, if www.example.com is being redesigned but jobs.example.com and blog.example.com are not, Same domain prevents those other subdomains from being treated as part of the website being crawled.
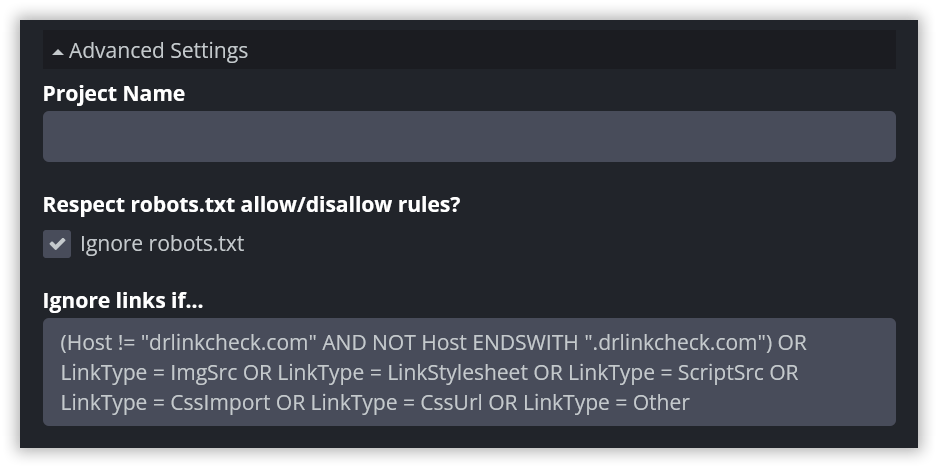
Dr. Link Check normally checks and reports all types of links, which is exactly what you want for a comprehensive broken-link check. For this particular job, however, checking every image, stylesheet, script, and outgoing link may consume a lot of your subscription’s link allowance without making the URL migration inventory more useful.
Under Advanced Settings → Ignore links if…, you can use an ignore rule to remove those links from the check. For a site on example.com, for instance, you can use:
(Host != "example.com" AND NOT Host ENDSWITH ".example.com") OR LinkType = ImgSrc OR LinkType = LinkStylesheet OR LinkType = ScriptSrc OR LinkType = CssImport OR LinkType = CssUrl OR LinkType = Other
Replace example.com with the site’s actual root domain.
This rule removes links outside the root domain along with common image, stylesheet, script, and miscellaneous resource links.
Notice that we’re not simply saying “keep only <a href> links.” Other potentially useful links remain in the report, including URLs found in social media meta tags, meta refresh tags, and XML sitemaps.
This filtering step is optional. If the site is small enough that the additional links aren’t a concern, keeping the broader crawl can be useful. And if files such as images or other resources have URLs that must survive the redesign, make sure your settings don’t exclude the links you actually need to migrate.
Before exporting anything, look through the results. The goal isn’t to audit every link yet. You’re checking whether the crawl looks like a useful representation of the site you’re about to migrate.
Are the main sections of the website present? Are URLs from the sitemap appearing? Are large numbers of irrelevant resources still cluttering the report? Is a subdomain showing up that isn’t part of the redesign?
If something looks wrong, adjust the project settings and rerun the check before continuing.
A redesign doesn’t start with a clean slate. The old site may already contain URLs that redirect elsewhere. Those redirects are worth reviewing before you create the new migration plan. Otherwise, you risk carrying years of accumulated redirect decisions and unnecessary redirect chains into the redesigned site.
In the All links report, click Add in the Filter bar and choose Redirect type.
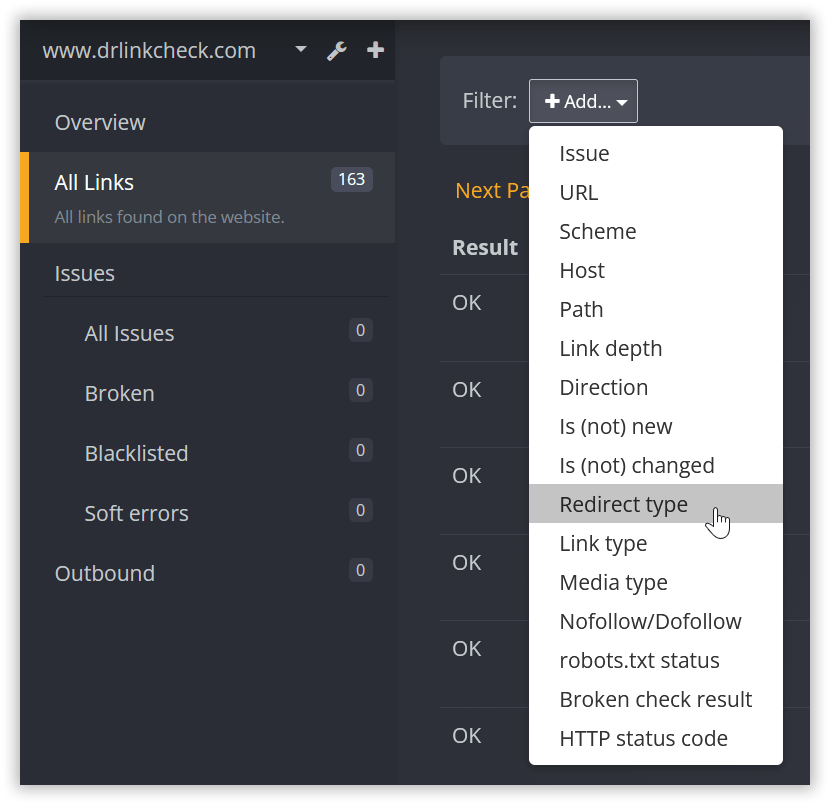
By default, this shows temporary HTTP redirects using status codes 302, 303, or 307. Review these links and check whether the redirect is still intentional.
Then open the drop-down menu next to Redirect type and go through the other available values: Permanent (HTTP), HTTP refresh, Meta refresh, JavaScript, and Frame. For each redirect, inspect both the destination and how the old URL is being used.
When you hover over the Redirect tag next to a link in the report, a tooltip shows how many times the link was redirected. Click Details to see all locations in the redirect chain.
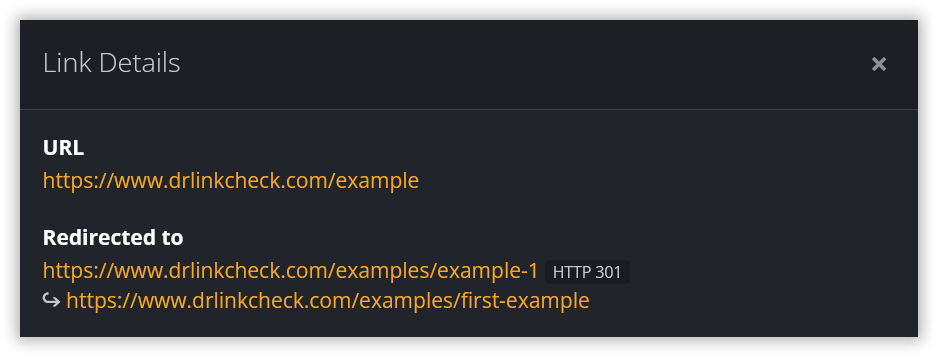
Pay particular attention to long redirect chains. For example:
/seo → /seo-services → /services/seo
Every additional hop adds another dependency that can eventually break. If /services/seo is the intended final destination, there is usually no benefit in preserving the intermediate redirect through /seo-services.
If you find URLs in the redirect chain that are still referenced in bookmarks, old emails, search results, or backlinks, keep redirects for those URLs, but point them directly to the final destination:
/seo → /services/seo
/seo-services → /services/seo
This removes unnecessary hops without breaking old references.
In short: update links you control to point directly to the final URL, while keeping redirects for old references you don’t control.
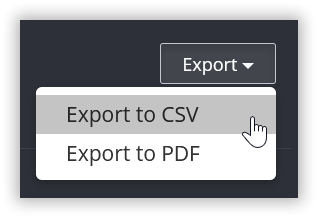
Once you’re satisfied with the crawl, go back to the All links report. Then click Export and select Export to CSV from the drop-down menu.
This will generate a CSV file you can open in Microsoft Excel or other spreadsheet software for further processing. The export contains the URL itself along with information such as the final redirect destination and redirect type, link type, direction, media type, nofollow and noindex information, robots.txt status, and the first source URL where the link was found.
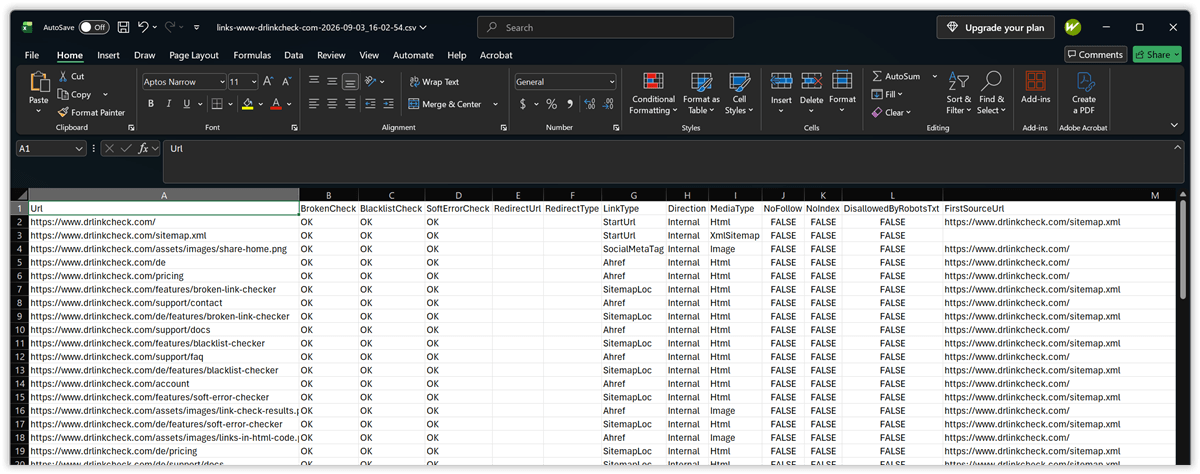
Don’t worry about turning all of that into a migration plan yet. Keep this export as your raw crawl inventory. In the next step, we’ll add the information needed to decide whether each relevant old URL should stay where it is, move somewhere else, be consolidated with another page, or disappear intentionally.
Now that you have an inventory of the existing site, the next step is to decide what should happen to those URLs after the redesign. There is one important rule to start with:
Don’t change a URL just because you’re redesigning the website.
A new design, CMS, navigation structure, or page template doesn’t automatically require a new URL structure. If an existing URL still accurately represents the resource and can continue to work on the new site, keeping it is usually the simplest and safest option.
This isn’t a new idea. In his 1998 W3C note Cool URIs don’t change, Tim Berners-Lee argued that website reorganization is not, by itself, a good reason to change published addresses. Once a URL has been published, you cannot know everywhere it has been referenced: other websites may link to it, users may have bookmarked it, and references may exist completely outside your control. He also argued that public URLs should be kept independent of changeable implementation details such as file locations or server-side technology. More than 25 years later, that principle is just as useful during a website redesign:
Keep the URL if you can. Redirect it if you must.
The Dr. Link Check export already gives you useful information about the existing URL, including whether it currently redirects and where the redirect leads.
For the migration plan, add a few columns of your own. A practical starting point is:
| Old URL | Planned action | New URL | Expected result | Reason |
|---|---|---|---|---|
/website-design |
Keep | /website-design |
200 | URL can remain unchanged |
/seo-services |
Move | /services/seo |
Permanent redirect → 200 | URL structure is changing |
/blog/old-seo-guide |
Consolidate | /guides/seo |
Permanent redirect → 200 | Content merged into new guide |
/summer-offer-2025 |
Remove | — | 404 or 410 | Expired offer, no replacement |
For a large migration, you may also want columns such as Priority, Owner, or Notes.
Later, when we test the redesigned site, we’ll add columns for the actual result and whether the URL passed or failed. For now, concentrate on defining the expected behavior.
The important part is that every relevant URL gets an intentional outcome.
This should be the first option you consider. Suppose the old website has:
https://www.example.com/website-design
The page is being redesigned, perhaps moved into a different CMS and given completely new HTML, but it still represents the company’s website design service. If there is no compelling reason to change the address, keep it. The user doesn’t need to know that the CMS, templates, database structure, navigation, or technology behind the page has changed.
Preserving the URL has several advantages:
In other words, the safest redirect is the one you don’t need.
Don’t take this principle too far, though. Keeping an old URL doesn’t mean you should reuse it for something completely unrelated. The address should still represent substantially the same resource.
Sometimes a URL genuinely has to change. For example:
https://www.example.com/seo-services
might become:
https://www.example.com/services/seo
If the new URL represents the same resource, record the change explicitly in the migration matrix:
Old URL:         /seo-services
Planned action:  Move
New URL:         /services/seo
Expected result: Permanent redirect → 200
The old URL should eventually lead directly to the new one using a permanent HTTP redirect, typically a 301 or 308. But before accepting the change, ask one additional question:
Why does this URL need to change?
If the answer is merely “the new structure looks cleaner,” reconsider whether the benefit is worth introducing a migration.
One useful discipline is to require a reason in the migration matrix for every URL that changes. This turns URL changes from an automatic consequence of a redesign into deliberate decisions.
A website redesign often involves cleaning up old content. Suppose the old site contains the following overlapping articles:
/blog/seo-basics
/blog/seo-tips
/blog/old-seo-guide
and the new site combines the useful material into:
/guides/seo
Those old pages aren’t simply “moving.” Several resources are being consolidated into one. Record that distinction in the migration matrix:
| Old URL | Planned action | New URL |
|---|---|---|
/blog/seo-basics |
Consolidate | /guides/seo |
/blog/seo-tips |
Consolidate | /guides/seo |
/blog/old-seo-guide |
Consolidate | /guides/seo |
The important question is whether the new destination is a genuine replacement for what users expected at the old URL. Don’t redirect a deleted page to the homepage simply to avoid returning a 404.
Some old resources should simply disappear. Imagine:
https://www.example.com/summer-offer-2025
The promotion has ended, there is no equivalent current offer, and there is no useful page that satisfies the same purpose. In that case, the correct migration decision may be:
Planned action:  Remove
New URL:         —
Expected result: 404 or 410
A 404 isn’t automatically a migration failure. An unexpected 404 is a problem. An intentional 404 or 410 for a resource that has been removed without a suitable replacement can be exactly the result you planned.
That distinction will become important when we build the migration tests later. The goal isn’t to make every historical URL return 200 OK somehow. The goal is for every URL to behave as intended.
You don’t have to make every decision on the first pass. If you’re unsure whether a page should survive, whether another page is a suitable replacement, or why an existing redirect exists, mark it as Investigate. For example:
| Old URL | Planned action | Reason |
|---|---|---|
/partners/old-product |
Investigate | Need to confirm whether product still exists |
/help/setup-v1 |
Investigate | Check whether new documentation covers same topic |
This is better than guessing. But treat Investigate as a temporary status. Before launch, every URL that matters should eventually have a defined outcome.
The redirect review from the previous section becomes useful here. Suppose Dr. Link Check showed that:
/seo
already redirects to:
/seo-services
and the redesign will move /seo-services to:
/services/seo
If you simply preserve the existing redirect and add another one, you could end up with:
/seo → /seo-services → /services/seo
Your migration matrix should make the intended final destination clear:
| Old URL | Current redirect | Planned final destination |
|---|---|---|
/seo |
/seo-services |
/services/seo |
/seo-services |
— | /services/seo |
Some URL changes will be unavoidable. When you create a new URL, don’t design it only for the website you have today.
Berners-Lee warned about putting information into URLs that is likely to change: implementation details, software mechanisms, organizational structures, document status, and similar temporary characteristics. His broader point is that the more a public address depends on today’s internal implementation or classification, the more likely you’ll need to change it later.
For example, think carefully before creating URLs that expose details such as:
/cgi-bin/
/wordpress/
/new-site/
/v2/
/old/
/draft/
The exact choices depend on the site, and even apparently descriptive categories can change over time. The useful question is:
Could we reasonably keep this URL if we redesigned the site again five years from now?
A migration is an opportunity not only to repair URLs that have become problematic, but to avoid creating the same problem for the next team.
Your migration matrix now defines what should happen to each old URL. The next step is to put those decisions into practice.
For URLs marked Keep, make sure the redesigned site continues serving the page at exactly the same address. For URLs marked Move or Consolidate, create a permanent redirect to the destination recorded in the matrix. URLs marked Remove should return the intended response rather than being redirected somewhere unrelated.
How you implement this depends on the platform running the site.
On WordPress, redirects can be managed with a plugin such as Redirection. For a small migration, you can enter the old and new paths individually:
Source URL: /seo-services
Target URL: /services/seo
For a larger migration, entering hundreds of mappings manually is unnecessarily error-prone. Redirection can import redirects from CSV, which fits neatly with the migration spreadsheet from the previous section. The basic format is simply:
source URL,target URL
For example:
/seo-services,/services/seo
/old-seo-guide,/guides/seo
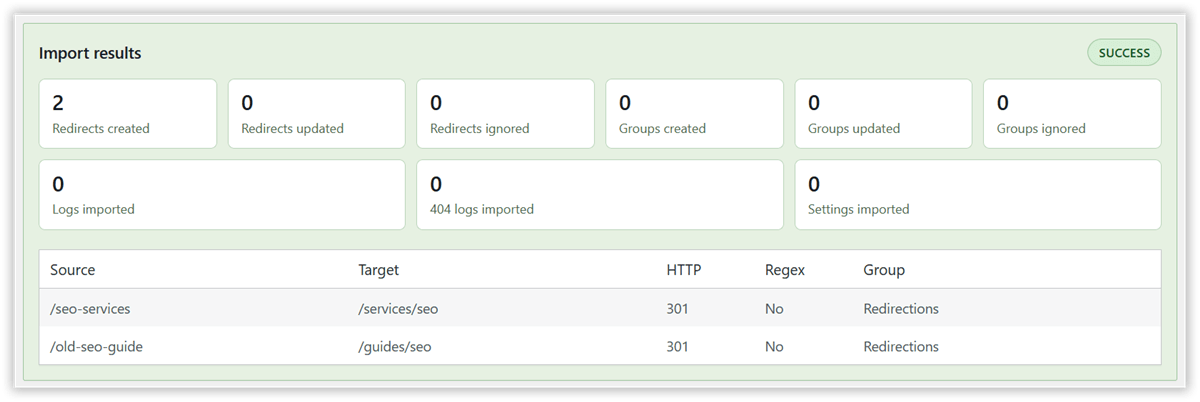
Redirection also supports regular expressions (regex). This is particularly useful when many URLs follow the same old and new pattern.
Suppose an entire section is moving from:
/products/widget-a
/products/widget-b
/products/widget-c
to:
/shop/widget-a
/shop/widget-b
/shop/widget-c
Instead of creating a separate redirect for every product, you could enable Redirection’s Regex option and use:
Source URL: ^/products/(.*)
Target URL: /shop/$1
Here, (.*) captures everything following /products/, and $1 inserts that captured part into the new URL. So:
/products/widget-a → /shop/widget-a
/products/widget-b → /shop/widget-b
A single redirect can therefore replace hundreds or thousands of individual mappings when the URL transformation is genuinely systematic.
Regex can also handle transformations such as removing an old file extension. For example:
Source URL: ^/guides/(.*?)\.html$
Target URL: /guides/$1/
would turn:
/guides/seo.html → /guides/seo/
The power of regex is also what makes it risky. Before replacing a large group of explicit mappings with one pattern, compare the rule against your migration matrix and look for exceptions. If most URLs under /products/ move to /shop/, but /products/documentation and /products/compare have different destinations, a blanket pattern would redirect them incorrectly.
Make your patterns as specific as necessary. Anchors such as ^ and $ can help restrict where a match begins and ends, and can also prevent rules from unexpectedly matching their own destination and creating redirect loops.
Also check how query parameters, trailing slashes, and letter case should be handled. Redirection provides options for these, while regex rules require you to account for some of these details yourself.
For a migration, the safest approach is usually a combination: use explicit redirects for exceptional URLs and regex rules for transformations that are truly consistent.
.htaccessIf the website runs on Apache and .htaccess is available, simple redirects can be implemented with Apache’s Redirect directive:
Redirect 301 "/seo-services" "/services/seo"
Apache’s documentation recommends mod_alias, which provides Redirect, for simple URL redirections; more complicated transformations can use mod_rewrite.
There is one detail worth knowing before adding hundreds of rules: Redirect performs prefix matching. This rule:
Redirect 301 "/products" "/shop"
doesn’t apply only to /products. A request for:
/products/widget-a
will also match, with the remainder of the path appended to the new destination. That can be exactly what you want when an entire section moves. It can also produce unintended redirects if some URLs under /products have different destinations.
If you want an exact match, a regular-expression rule makes that explicit:
RedirectMatch 301 "^/seo-services$" "/services/seo"
Also pay attention to rule order. When multiple Redirect or RedirectMatch directives in the same context could apply, Apache processes them in order and the first match takes precedence. More specific rules should therefore normally appear before broader ones.
With Nginx, an individual exact redirect can be expressed with an exact-match location:
location = /seo-services {
    return 301 /services/seo;
}
The return directive can send a 301 redirect, while the = modifier makes the location match that particular URI exactly.
For redirects based on patterns, Nginx also provides rewrite functionality.
For large migrations, pattern-based redirects and bulk replacements can save a lot of work. But a rule that is correct for most URLs can still send important exceptions to the wrong place.
Suppose most product URLs move like this:
/products/widget-a → /shop/widget-a
Before applying the same rule to everything under /products/, test variations such as:
/products/widget-a?ref=newsletter
/products/widget-a/
/Products/widget-a
/products/documentation
These raise different questions: Should query parameters be preserved? Should URLs with and without a trailing slash behave the same way? Is matching case-sensitive? And is /products/documentation really supposed to become /shop/documentation?
Also watch for overlapping rules. For example:
/products/documentation → /docs/
/products/*             → /shop/*
Both could match /products/documentation, so make sure the more specific exception is handled correctly.
Once the redesigned site is ready, it’s time to verify that the migration actually behaves as planned. There are two different tests to run:
You need both. A crawl of the new site cannot tell you what happened to an old URL that is no longer linked anywhere.
In Section 1, you crawled the existing website to establish a baseline. Now repeat that process for the redesigned site, ideally while it is still on staging. Use the same crawl scope, but remove or adjust any inventory-specific ignore rule so the new crawl includes the resources and outbound links you want to test.
Review the results for any problems introduced during the redesign, including broken internal links, missing images or downloads, redirect loops or chains, and links that still point to redirected URLs.
After making corrections, rerun the check until the remaining issues are understood and intentional.
The site crawl only checks URLs that Dr. Link Check discovers while crawling the redesigned site. Your migration matrix contains another important group: old URLs that may no longer be linked anywhere. Those URLs still need to be tested.
Copy the Old URL column from your migration spreadsheet, then create a separate Dr. Link Check project:
Selecting None for URLs to crawl is important. It tells Dr. Link Check to check only the URLs you supplied rather than following links and crawling the sites they lead to.
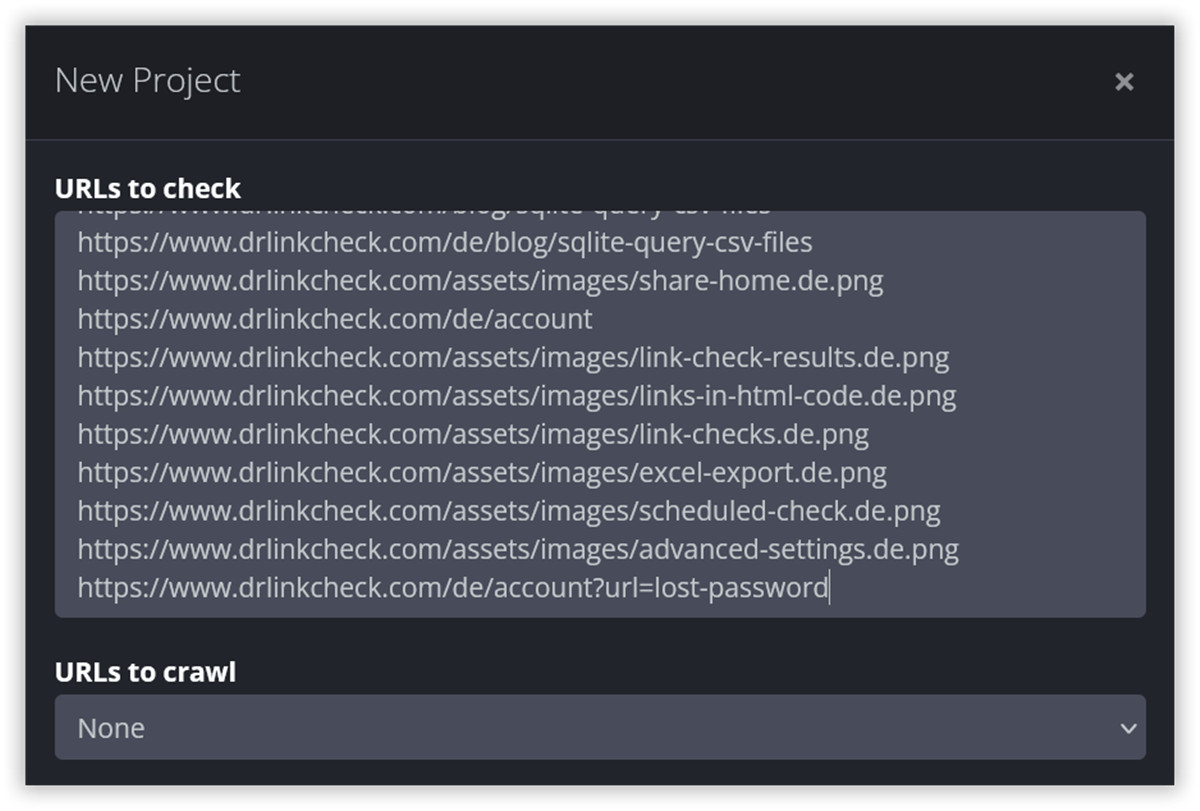
Once the check finishes, compare the actual results with the expected behavior in your migration matrix. For example:
| Old URL | Expected result | Actual result | Test |
|---|---|---|---|
/website-design |
200, no redirect | 200 | Pass |
/seo-services |
Permanent redirect to /services/seo |
Permanent redirect to /services/seo |
Pass |
/old-seo-guide |
Permanent redirect to /guides/seo |
Redirects to /blog, then /guides/seo |
Fail |
/summer-offer-2025 |
404 or 410 | 404 | Pass |
Add columns such as Actual result, Actual destination, and Pass/Fail to the migration matrix if you haven’t already.
The important point is that a migration test asks a different question from an ordinary broken-link check. A 404 isn’t necessarily a failure. If /summer-offer-2025 was deliberately removed and your migration plan specifies a 404 or 410, that result is correct. Likewise, a URL isn’t necessarily a success just because it eventually loads a working page. If you expected:
/seo-services → /services/seo
but actually get:
/seo-services → /services → /services/seo
the final page works, but the migration test should still fail because an unnecessary redirect was introduced. The standard is not simply “Does this URL work?” It is: “Does this URL behave exactly as we planned?”
Even if everything passes on staging, repeat the tests after the redesigned site goes live. Production may use different web server rules, CDN configuration, caching, domain settings, or other infrastructure that wasn’t present on staging. At minimum:
It is also worth checking again after the site has been live for a while. Analytics, Search Console, server logs, support requests, or other sources may reveal old URLs that weren’t in your original inventory. Add those URLs to the migration matrix, decide what should happen to them, and test them in the same way.
At that point, the migration matrix is no longer just a planning document. It has become a repeatable test suite for proving that the old and new URL structures connect exactly as intended.
Preventing broken links during a website redesign is less about fixing 404s after launch and more about controlling what happens to every important old URL.
Start with a reliable inventory, keep URLs unchanged wherever possible, define an explicit outcome for URLs that do change, implement redirects carefully, and then test the results against your migration matrix.
Dr. Link Check can support that process at several stages: inventorying the old site, reviewing existing redirects, checking the redesigned site for broken or redirected links, and mass testing old URLs after the migration.
The key is to treat the redesign as a testable URL migration, not just a visual or technical rebuild. If you know what each old URL is supposed to do and verify that it actually does it, you greatly reduce the risk of broken links, unnecessary redirect chains, and forgotten URLs slipping through the redesign.